
Jul 24, 2015
Melnor WiFi AquaTimer Review
Jun 12, 2015
How many sprinklers can a garden hose run?
What are the best hose connected sprinklers and how many can you connect together? If you don't have an irrigation system for your lawn you'll probably be setting up hose connected sprinklers at certain times like when you've spread grass seed or some fertilizers that need to be watered in or kept moist or if you want to keep it looking green and lush during the hot, dry summer.
There isn't a simple answer to how many sprinklers you can connect to one hose because you'll need to check your water pressure and flow rate which will be different for most people. They're very simple to check and I'll show you how to connect them to get the best use without wasting water. I also recommend using Hunter MP Rotator sprinklers because you'll be able to run more of them simultaneously compared to other sprinklers.
There are also a bunch of different types of single hose-connected sprinklers sold and many are marketed as if one sprinkler will be enough. It won't. If you want to water your lawn evenly and you don't want to waste water you'll need more than one. We'll use a fairly simple 35' x 35' patch of lawn.
 If you have a let's say a single sprinkler, maybe a rotor or impulse sprinkler, in a corner set to 35' distance you can clearly see that the upper right hand corner isn't getting watered at all and the area that is getting watered isn't getting watered evenly because sprinklers have a higher precipitation rate closer to the sprinkler head than they do at the edges. Same problem if you just have the sprinkler in the middle, even if it's one that has a square pattern. The light blue area shows the water distribution in the illustration.

So you may think you'll just get a sprinkler that throws water 50' which will cover the entire 35' square patch of lawn. Now all your lawn is getting wet, and so is your sidewalk, house, neighbor's lawn, walkway, patio, or whatever is just past the lawn area. You also still haven't solved the problem of uneven watering. If you set your timer to water so that the edges get enough water you'll be drowning the lawn near the sprinkler which at best is wasting water and at worst is promoting disease.


With 2 sprinklers both set at a 35' radius at opposite corners you'll do a lot better than with just 1 but with 4 sprinklers at each corner set at 35' you can see you get very even coverage. This is how professionals design sprinkler systems with head-to-head spacing. One sprinkler head is positioned at the edge of where another sprinkler leaves off it's watering so that the two overlap and provide an even distribution of water.
As you plan out where you'll put your sprinklers with head-to-head spacing you'll notice you probably need more sprinklers than you first thought. This is why it's important to know how many sprinklers you can run off your garden hose if you're using hose-connected sprinklers.
 and attach it to your hose bib (aka sillcock or outside faucet) where you would normally attach your garden hose. Make sure no other water fixtures are open then open up the valve to your hose bib all the way and read the pressure on the gauge in PSI. Write this down, this is your static water pressure.
You need more pressure than just the pressure required by your sprinklers to account for pressure loss in the pipes and other fixtures encountered along the way. For example if you plan on using sprinklers that run at 40PSI you're going to need to have more than 40PSI of pressure to account for the pressure drop caused by items in your water supply such as valves, pipes, filters, backflow devices, pressure regulators, etc.
You can look up the pressure loss for all the different devices that lead from your water supply, through your home and to your sprinkler, or you can just hook up everything you'd have hooked up when the sprinkler is functioning, such as vacuum breaker, timer, hose, etc. and see if the sprinkler works. Measure the distance the sprinkler is throwing water and compare that to the specs the manufacturer supplies to figure out how much pressure is getting to the sprinkler. If the manufacturer lists the specs of the sprinkler as having a radius of 10' at 40PSI and you measured a 10' radius on your sprinkler you have 40 PSI available to the sprinklers.
One important thing to note, you won't need 40 PSI for each sprinkler head. So if you have 40PSI after subtracting the pressure drop for different devices you can run multiple sprinkler heads. If you have adequate pressure to run one sprinkler in your test you should be able to run multiple provided you use a large enough diameter hose (at least 5/8" but it might be cheaper to get 3/4" or larger poly pipe and make your own hoses if you want to run a lot of sprinklers) and have sufficient water flow which we'll get to next.
To find the flow rate in gallons per minute (GPM) use the following formula:
(Capacity of bucket in gallons / seconds to fill bucket ) x 60 = flow rate GPM
If it took 40 seconds to fill the 5 gallon bucket the flow rate would be (5/40) * 60 = 7.5 GPM.
That is the maximum water flow you can get but there are certain situations where your plumbing may deliver water at a higher flow rate than is safe. If the speed of water flowing through the pipes is greater than 5 feet per second it can be hard on your system, make it fail sooner and cause issues such as water hammer.
The main variable that determines the maximum safe speed at which water flows through the pipe is the inside diameter of the pipe. You should inspect your plumbing system from the point of contact with your water supply, through your meter all the way to where you connect your sprinklers to find the smallest pipe and use the maximum safe flow of that smallest pipe to be the maximum flow rate you design your system for.
For example if you have 3/4" pipe coming from the city water main to your meter and 3/4" pipe going to your house bib from your inside plumbing but in between the meter and where the hose bib connects is 1/2" copper pipe, you need to design the system for the maximum flow that 1/2" copper pipe can handle.
Here's a table showing the maximum flow rates for various pipes and diameters that are commonly used in residential plumbing.
The inside diameter of garden hoses isn't as consistent as plumbing pipe which is another good reason to make your own hoses using 3/4" or larger poly tubing and fittings. If you plan on going with sprinklers that use a high flow rate and you're going to have long runs of hose/pipe try to go with a large diameter for the hoses to minimize the pressure drop in the pipes caused by friction.
So now you know you have enough pressure, you know the maximum safe flow for your system which is the maximum flow of the smallest inside diameter pipe you found in the chart above or the maximum flow you measured with the bucket, whichever is smallest.
To figure out how many sprinklers you can attach to your hose that will all run at the same time, divide your max safe flow by the GPM of the sprinkler. If you're using sprinklers with different flows, subtract each one individually from the max safe flow until you still have a positive number.
So if you're limiting flow is the 1/2" Type L copper pipe in your home's plumbing for example, your max flow will be 3.6 GPM. If all your sprinklers flow rates are 1GPM you can add 3 of them on the same line to run simultaneously. If you need more sprinklers you can set them up on a separate hose and run them at a different time, essentially creating sprinkler zones.
They deliver water through rotating streams at a much slower rate than traditional spray nozzles which will consume less water flow as well as allow the water to seep into the soil to prevent runoff. With Hunter MP Rotator nozzles you can connect more sprinklers to your hose.
Let's pretend we have a 30' x 30' square patch of grass we'd like to water and we want to use 4 sprinklers to get even coverage to avoid over or under watering our lawn. Most of the plumbing in the home is 1/2" Type L copper pipe which limits our safe water flow to 3.6 GPM even though our high water pressure actually can deliver more. The actual water pressure delivered to our sprinklers will be 45 PSI.
If we used Hunter's PGP Rotor sprinkler on spikes and connected them up with hoses. At 45 PSI, using the smallest nozzle for the PGP sprinkler, each sprinkler would consume about 1.5 GPH to reach 30' for a total of 6 GPH for all 4 which exceeds our safe maximum flow. The most we could attach would be 2 PGP sprinklers.
If instead we use Hunter's MP3000 Rotator Nozzles at 40 PSI they can cover the same 30' but each one only consumes 0.86 GPH set at a 90 degree angle for a total 3.44 GPH for 4 nozzles. That will work with our design constraints.
For smaller areas the water consumption of MP Rotators can be as little as 0.19 GPM. There are different size MP Rotators and their flow will vary by their adjustable radius, check out Hunter's site for MP Rotator specs. They cost a little more than other spray nozzles but their low flow rate has many benefits. In addition to delivering water at a slower precipitation rate that minimizes run off, if your home's plumbing doesn't have large pipes, using MP Rotators can save you considerable plumbing costs that would be necessary to deliver a higher volume of water for other sprinkler types.
Note: Even if you're just running a garden hose without sprinklers it's a good idea to have some sort of vacuum breaker. It could be as simple as this vacuum breaker that screws on your hose bib but check local codes to see what's appropriate in your area.
 are available. It's a metal spike you can push into the ground and they have 3 connection points. One female port with hose threads that you can connect the male end of a garden hose, one male port with hose threads that you can connect the female end of a garden hose and one 1/2" port with pipe threads that accepts a standard 1/2" sprinkler riser. These are the same risers used to connect pop-up sprinkler bodies to irrigation pipes.

The MP Rotators work best at 40 PSI and Hunter makes a PRO Spray 40 PSI body but you don't need a pop-up sprinkler on a spike so it's simpler to just use a Hunter Pro-Spray PRS40 HUPROS00PRS40 Shrub Adapter . It has a 1/2" pipe threaded inlet on the bottom and you can screw in an MP Rotator Nozzle on the top.

Connect one side of the spike to the garden hose and run the other side to another hose going to another sprinkler. The spikes come with caps on one end. When connecting spikes together you'll remove the cap but keep one on at the end of the run.
Here's how to hook up one in-ground sprinkler to allow you to attach a garden hose to it.

The parts in the diagram are:
To connect more than one pop-up sprinkler just ad more pipe,fittings and sprinklers but you only need one valve box and hose connection for all the connected sprinklers. Just remember to keep the number of sprinklers within the design parameters. If you exceed the flow, add the other sprinklers to a new "zone" with it's own hose connection and valve box. Just make sure you locate the auto drain at the lowest point in the line. It doesn't necessarily need to be under the hose connection.
There isn't a simple answer to how many sprinklers you can connect to one hose because you'll need to check your water pressure and flow rate which will be different for most people. They're very simple to check and I'll show you how to connect them to get the best use without wasting water. I also recommend using Hunter MP Rotator sprinklers because you'll be able to run more of them simultaneously compared to other sprinklers.
Why More Than One Sprinkler?
There are a few different DIY sprinklers out there like LawnBelt and Watering Made Easy but I'm not a big fan of them because they don't deliver water efficiently. Plus you can build your own system better and cheaper.There are also a bunch of different types of single hose-connected sprinklers sold and many are marketed as if one sprinkler will be enough. It won't. If you want to water your lawn evenly and you don't want to waste water you'll need more than one. We'll use a fairly simple 35' x 35' patch of lawn.
So you may think you'll just get a sprinkler that throws water 50' which will cover the entire 35' square patch of lawn. Now all your lawn is getting wet, and so is your sidewalk, house, neighbor's lawn, walkway, patio, or whatever is just past the lawn area. You also still haven't solved the problem of uneven watering. If you set your timer to water so that the edges get enough water you'll be drowning the lawn near the sprinkler which at best is wasting water and at worst is promoting disease.
With 2 sprinklers both set at a 35' radius at opposite corners you'll do a lot better than with just 1 but with 4 sprinklers at each corner set at 35' you can see you get very even coverage. This is how professionals design sprinkler systems with head-to-head spacing. One sprinkler head is positioned at the edge of where another sprinkler leaves off it's watering so that the two overlap and provide an even distribution of water.
As you plan out where you'll put your sprinklers with head-to-head spacing you'll notice you probably need more sprinklers than you first thought. This is why it's important to know how many sprinklers you can run off your garden hose if you're using hose-connected sprinklers.
Adequate Water Pressure
The first variable you'll need to determine is the static water pressure in your water lines. This is very easy to figure out. Just get yourself a Rain Bird P2A Pressure GaugeYou need more pressure than just the pressure required by your sprinklers to account for pressure loss in the pipes and other fixtures encountered along the way. For example if you plan on using sprinklers that run at 40PSI you're going to need to have more than 40PSI of pressure to account for the pressure drop caused by items in your water supply such as valves, pipes, filters, backflow devices, pressure regulators, etc.
You can look up the pressure loss for all the different devices that lead from your water supply, through your home and to your sprinkler, or you can just hook up everything you'd have hooked up when the sprinkler is functioning, such as vacuum breaker, timer, hose, etc. and see if the sprinkler works. Measure the distance the sprinkler is throwing water and compare that to the specs the manufacturer supplies to figure out how much pressure is getting to the sprinkler. If the manufacturer lists the specs of the sprinkler as having a radius of 10' at 40PSI and you measured a 10' radius on your sprinkler you have 40 PSI available to the sprinklers.
One important thing to note, you won't need 40 PSI for each sprinkler head. So if you have 40PSI after subtracting the pressure drop for different devices you can run multiple sprinkler heads. If you have adequate pressure to run one sprinkler in your test you should be able to run multiple provided you use a large enough diameter hose (at least 5/8" but it might be cheaper to get 3/4" or larger poly pipe and make your own hoses if you want to run a lot of sprinklers) and have sufficient water flow which we'll get to next.
Sufficient Water Flow
If you have enough water pressure to run the sprinklers the next important variable to consider is the volume of water that you can get to the sprinklers. This is fairly easy to measure. Grab a 5 gallon bucket and time how long it takes to fill it up with a hose that's connected as if it was set up for your sprinkler system. Meaning attach the timer, the vacuum breaker, the diameter hose you'll be using etc.To find the flow rate in gallons per minute (GPM) use the following formula:
(Capacity of bucket in gallons / seconds to fill bucket ) x 60 = flow rate GPM
If it took 40 seconds to fill the 5 gallon bucket the flow rate would be (5/40) * 60 = 7.5 GPM.
That is the maximum water flow you can get but there are certain situations where your plumbing may deliver water at a higher flow rate than is safe. If the speed of water flowing through the pipes is greater than 5 feet per second it can be hard on your system, make it fail sooner and cause issues such as water hammer.
The main variable that determines the maximum safe speed at which water flows through the pipe is the inside diameter of the pipe. You should inspect your plumbing system from the point of contact with your water supply, through your meter all the way to where you connect your sprinklers to find the smallest pipe and use the maximum safe flow of that smallest pipe to be the maximum flow rate you design your system for.
For example if you have 3/4" pipe coming from the city water main to your meter and 3/4" pipe going to your house bib from your inside plumbing but in between the meter and where the hose bib connects is 1/2" copper pipe, you need to design the system for the maximum flow that 1/2" copper pipe can handle.
Here's a table showing the maximum flow rates for various pipes and diameters that are commonly used in residential plumbing.
| Pipe Size | |||||||
|---|---|---|---|---|---|---|---|
| Pipe | 1/2” | 5/8” | 3/4” | 1” | 1-1/4” | 1-1/2” | 2” |
| Poly Pipe | 4.7 | - | 8.3 | 13.4 | 23.3 | 31.7 | 52.3 |
| PEX Pipe | 2.7 | 4 | 5.5 | 9.1 | 13.6 | 19 | - |
| Copper Type K | 3.4 | 5.2 | 6.7 | 12.1 | 18.9 | 26.8 | 46.9 |
| Copper Type L | 3.6 | 5.4 | 7.5 | 12.8 | 19.5 | 27.7 | 48.2 |
| Copper Type M | 3.9 | 5.8 | 7.9 | 13.6 | 20.3 | 28.5 | 49.4 |
| Steel Sch 40 | 4.7 | - | 8.3 | 13.4 | 23.3 | 31.7 | 52.3 |
| PVC Sch 40 | 4.3 | - | 7.9 | 12.9 | 22.6 | 30.9 | 51.3 |
| PVC Sch 80 | 3.3 | - | 6.3 | 10.7 | 19.2 | 26.6 | 44.8 |
The inside diameter of garden hoses isn't as consistent as plumbing pipe which is another good reason to make your own hoses using 3/4" or larger poly tubing and fittings. If you plan on going with sprinklers that use a high flow rate and you're going to have long runs of hose/pipe try to go with a large diameter for the hoses to minimize the pressure drop in the pipes caused by friction.
So now you know you have enough pressure, you know the maximum safe flow for your system which is the maximum flow of the smallest inside diameter pipe you found in the chart above or the maximum flow you measured with the bucket, whichever is smallest.
To figure out how many sprinklers you can attach to your hose that will all run at the same time, divide your max safe flow by the GPM of the sprinkler. If you're using sprinklers with different flows, subtract each one individually from the max safe flow until you still have a positive number.
So if you're limiting flow is the 1/2" Type L copper pipe in your home's plumbing for example, your max flow will be 3.6 GPM. If all your sprinklers flow rates are 1GPM you can add 3 of them on the same line to run simultaneously. If you need more sprinklers you can set them up on a separate hose and run them at a different time, essentially creating sprinkler zones.
Best Hose Connected Sprinklers
Different sprinklers will consume different flow rates. Large impulse or rotor sprinklers can consume as much as 6 GPM or more while standard nozzles used on pop-up spray bodies can be 2 GPM or less. Because hose-connected sprinkler systems generally have a much lower water flow capacity than traditional in-ground sprinkler systems I think the best sprinklers to use are the Hunter MP Rotators. They have the lowest flow rates of any sprinkler nozzles I know and they just look cool. :)They deliver water through rotating streams at a much slower rate than traditional spray nozzles which will consume less water flow as well as allow the water to seep into the soil to prevent runoff. With Hunter MP Rotator nozzles you can connect more sprinklers to your hose.
Let's pretend we have a 30' x 30' square patch of grass we'd like to water and we want to use 4 sprinklers to get even coverage to avoid over or under watering our lawn. Most of the plumbing in the home is 1/2" Type L copper pipe which limits our safe water flow to 3.6 GPM even though our high water pressure actually can deliver more. The actual water pressure delivered to our sprinklers will be 45 PSI.
If we used Hunter's PGP Rotor sprinkler on spikes and connected them up with hoses. At 45 PSI, using the smallest nozzle for the PGP sprinkler, each sprinkler would consume about 1.5 GPH to reach 30' for a total of 6 GPH for all 4 which exceeds our safe maximum flow. The most we could attach would be 2 PGP sprinklers.
If instead we use Hunter's MP3000 Rotator Nozzles at 40 PSI they can cover the same 30' but each one only consumes 0.86 GPH set at a 90 degree angle for a total 3.44 GPH for 4 nozzles. That will work with our design constraints.
For smaller areas the water consumption of MP Rotators can be as little as 0.19 GPM. There are different size MP Rotators and their flow will vary by their adjustable radius, check out Hunter's site for MP Rotator specs. They cost a little more than other spray nozzles but their low flow rate has many benefits. In addition to delivering water at a slower precipitation rate that minimizes run off, if your home's plumbing doesn't have large pipes, using MP Rotators can save you considerable plumbing costs that would be necessary to deliver a higher volume of water for other sprinkler types.
How to Attach MP Rotators To Garden Hose
If you know even a little about MP Rotators you'll know they're meant to be used with pop-up sprinkler bodies found in in-ground sprinkler systems. You can't directly connect either to a garden hose but there are some ways around that.Note: Even if you're just running a garden hose without sprinklers it's a good idea to have some sort of vacuum breaker. It could be as simple as this vacuum breaker that screws on your hose bib but check local codes to see what's appropriate in your area.
MP Rotator on Spike
These metal irrigation spikes
The MP Rotators work best at 40 PSI and Hunter makes a PRO Spray 40 PSI body but you don't need a pop-up sprinkler on a spike so it's simpler to just use a Hunter Pro-Spray PRS40 HUPROS00PRS40 Shrub Adapter

Connect one side of the spike to the garden hose and run the other side to another hose going to another sprinkler. The spikes come with caps on one end. When connecting spikes together you'll remove the cap but keep one on at the end of the run.
Hose-Connected In-ground Sprinklers
Another option is to just use pop-up sprinkler bodies and bury them in the ground. We just need to provide a way to attach a hose and it would be a good idea to add an auto drain so that it won't get damaged in the winter if you live in a climate where the temperature can drop below freezing.Here's how to hook up one in-ground sprinkler to allow you to attach a garden hose to it.

The parts in the diagram are:
- Hunter PROS04PRS40CV Pro-Spray 4-Inch Pop-Up Sprinkler 40 PSI with Drain Check Valve
with MP Rotator Nozzle
- 3/4" barb x 1/2" FPT 90 degree elbow poly fitting
- 3/4" barb poly tee fitting
- 3/4" barb x 3/4" FPT poly coupling fitting
- 3/4" barb x 3/4" FPT poly fitting
- 3/4" MPT x female garden hose threaded fitting
- Orbit WaterMaster Underground 51241 3/4-Inch Plastic Auto Drain Valve
- Male hose quick connect fitting
- 3/4" poly pipe
- 6" round valve box
To connect more than one pop-up sprinkler just ad more pipe,fittings and sprinklers but you only need one valve box and hose connection for all the connected sprinklers. Just remember to keep the number of sprinklers within the design parameters. If you exceed the flow, add the other sprinklers to a new "zone" with it's own hose connection and valve box. Just make sure you locate the auto drain at the lowest point in the line. It doesn't necessarily need to be under the hose connection.
Apr 27, 2015
Can you use LED lights to start Vegetables?

Prices have come down and a lot of new types of LED bulbs have been released in the past couple of years and I wanted to see if this would be a good spot where I could save some money. One new bulb that caught my eye were these T8 BallastCompatible® 2.0 Hybrid, 18W 4FT LED Light Tubes

The bulbs should work in most fixtures unmodified but if the bulbs start to blink on and off or exhibit any other odd behavior you'll need to rewire the fixture to bypass the ballast. You'll probably want to rewire the fixture anyway because doing so will save even more energy as the bulbs will only consume 18W instead of 22W. I had no issues running the Hyperikon bulbs in my Commercial Electric 2 light 4' fluorescent shop light fixture with the ballast but I do plan on rewiring it.
These Hyperikon bulbs aren't special plant grow bulbs. As I mentioned in a previous article on plant grow lights, any daylight (5000K-6500K color temperature) fluorescent bulbs will work for starting plants indoors from seed that will eventually be brought outdoors. If you're going to have flowering and fruiting plants grown indoors constantly, then you may need to invest in more expensive aquarium/plant lights but for just starting seedlings daylight colored bulbs work as well, if not better than grow lights.
But will vegetable seedlings grow well under regular LED bulbs like they do with regular fluorescent bulbs? That was the big question I wanted to answer so I set up one of my batches of tomato seeds under the Hyperikon bulbs to see if they'll work.
I set up my seed starting table in front of a south facing window in a warm room like I normally do. Even though it's a south facing window I found that in the past, before I used lights over my seedlings, the seedlings wouldn't get enough light and they'd get leggy. I think it's a combination of other structures blocking light and that there are a lot of rainy and overcast days this time of year. After I started growing them with additional light the stems stay short and get very thick. The plants also grew healthier and wound up producing more too.
Here you can see a time-lapse video of tomato seeds germinating and growing under the Hyperikon BallastCompatible tubes over a 2 week period. I ran the lights 24 hours because it made it easier to create the video and I've also found that my tomatoes do better with constant light instead of the normal 12-16 hours of light.
The video gets a little choppy at the end because the backup battery I use while the primary battery is recharging died. I'd normally keep the lights a little lower too but needed to leave extra room to take pictures of the seedlings.
As you can see though, the tomatoes did great under the LED tube lights. They grew nice and thick stems and stayed short which they wouldn't have done without supplemental lighting. Here's a still from the end of the video.

There was really only one issue using the LED bulbs. Since LEDs produce more directional light and the LEDs are only on the bottom of the tubes, plants on the outside edges of the tray furthest from the bulbs were developing a very pronounced lean towards the center.

The bulbs I used had a clear cover but I think the Frosted Hyperikon® LED Light Tubes
The leaning wasn't a big problem. Once the plants started to go outside to harden off they straightened up and all the plants are at similar heights. Next year though I'm likely going to use a 4-tube shop light such as the Lithonia Lighting 4-Light Heavy Duty Shoplight
Cost and Savings of LED vs Fluorescent
I'm satisfied that the bulbs perform at least as well as the daylight fluorescent tubes I was previously using. Now let's look to see if the savings are going to be worth it.Let's assume you only grow two trays of seeds a year under 2 light tubes which you keep on 16 hours a day for a total of 4 weeks before you move them outdoors. This is the minimum use for seed starting lights. In my area electricity costs about $0.15 per kWh.
With fluorescent tubes you'll pay $4.30 to power the lights for 4 weeks at 16 hours a day. With the Hyperikon bulbs it will only be $2.96 if you don't remove the ballast from your fixture and $2.42 if you do remove the ballast.
That's a minor savings that doesn't really justify the extra cost of the LED bulbs in the short term but what does justify the cost is not having to replace fluorescent tubes every year. Fluorescent tubes lose brightness pretty quickly and I have to purchase new bulbs every spring to get adequate light output. That's an additional $9.97 per year.
The Hyperikon LED bulbs will last for many years (decades really when only run 4 weeks a year) before the light output has diminished to the point where they no longer provide adequate light output. When factoring the cost of bulb replacement you'll realize savings in the 4th season of use even when just using the lights for 4 weeks a year to start your seedlings.

Other Benefits of LED Fluorescent Tube Replacements
No Yearly Replacement Costs
For use as seed starting lights fluorescent tubes will need to be replaced every year due to how quickly the light diminishes. That has a big impact in cost savings but also has the added benefit of being more convenient.Not only do you need to make a trip to get new tubes you also have to remember to bring your old tubes to be recycled. That's inconvenient and you're producing more waste.
No Glass or Mercury
Fluorescent tubes contain mercury and are made of glass. Neither of which you'd want to wind up in your potting soil. You can accidentally break them while setting up your seed starting bench, adjusting the height of the lights or moving trays in and out of your bench.The Hyperikon BallastCompatible tubes have a plastic cover which isn't as fragile as glass and there's no mercury.
Less Heat
While fluorescent bulbs don't get that hot, and having the plants touch the bulbs won't immediately harm the plants, prolonged exposure to the glass can result in damage to the plants and can be a safety issue. The Hyperikon bulbs are cool to the touch. The only thing warm in the fixture is the ballast which should be bypassed to save more energy.Lighting in a Windowless Garage
I also got the chance to try out another energy saving LED bulb from Hyperikon.After transplanting from plug trays to larger pots the seedlings need a day or two in a darker room to recover from the transplant shock My garage is very convenient for this purpose but it doesn't have any windows. I also use my garage to protect my plants on nights when temperatures approach freezing to prevent losing plants to frost.
I have the Hyperikon® 501080408 model

I installed this in a reflector and hung it in the middle of the garage. It's dimmable but I didn't have a dimmer handy for it. Instead I was able to control the light intensity by raising or lowering the light in relation to the trays I had on the garage floor.
After transplanting, I had the light fairly high to provide less intense light that was similar to how much light would be in the garage if it did have indirect light from windows. For a couple of nights in a row there were concerns of frost so I brought the plants into the garage at night and kept them there until following day after the sun had sufficiently heated the greenhouse. In these cases I hung the light lower to provide higher intensity. While the plants could have gone a bit with less light I didn't want to slow their growth.
The bulb does get warm but even after a couple of days of continuous use it wasn't too hot to handle. The amount of light it puts out is impressive considering it uses less energy than a standard 60W incandescent bulb. The inside of my single car garage was about as bright as a heavy overcast day.
If you do have a greenhouse or an indoor growing setup where you are only dealing with vegetative growth these would save a considerable amount of money over 400W HPS lights. A more practical purpose would be to use them for what they're intended for. To replace high wattage sodium vapor lights in a parking lot or warehouse. They use only about 14% of the energy and will need to be replaced far less often.
Summary
You can use LED lights to start your vegetable seeds indoors and you don't need special plant grow lights to do so for plants that will eventually be planted outside.The Hyperikon BallastCompatible tubes make it easy to upgrade because they'll fit in your current T8 fluorescent fixtures. Upgrading to LEDs is just a simple matter of replacing your current tubes. In some cases you may need to rewire the fixture to bypass the ballast but it's a good idea to do that anyway because it further reduces energy consumption by 25%.
If you have a lot of fixtures you can rewire them a few at a time while still gaining the benefits of LED bulbs in all your fixtures. These benefits include lower energy consumption, much longer bulb replacement intervals, less heat output and no glass or mercury hazards.
Although I used the clear version I think the frosted Hyperikon BallastCompatible tubes would be a better choice. Plants furthest away from the tubes leaned strongly towards the light and a more diffuse light source would help. This lean isn't harmful and will correct itself when you bring the plants outside to harden off.
At about $20 per tube the bulbs are affordable and you'll start to see savings after 3 years even if you're only using them for 16 hours a day for 4 weeks a year to start your vegetable seeds. If you use the lights more you'll see your savings sooner.
The Hyperkon bulbs are very well made and the company was very responsive when I had questions concerning installation.
Apr 3, 2015
Ryobi 4-Cycle Gas Trimmer Maintenance
Normal oil change interval is 25 hours or every season. Changing it every year just makes life simple because I don't have to remember if I changed it the year before or not. The RY34426 uses a Champion RY4C
Disconnecting the spark plug wire is an important safety measure before starting to work on small engines. It's usually one of the first things I do when tuning up engines after draining the old oil but this year I decided to keep the same spark plug in to see how well the engine ran with Royal Purple synthetic oil.
Using a spark plug socket wrench I removed the spark plug, checked to make sure it wasn't damaged or too dirty and checked the gap. Everything looked fine so I screwed it back in.
To get to the spark plug you first need to remove the top plastic engine cover using a T20 Torx screwdriver on a single screw on the top of the motor cover. You'll find the spark plug underneath between the muffler and cam cover.

Adjust Rocker Arm/Camshaft Clearance
Next, it's time to check the rocker arm clearance. This needs to be done every 25 hours or every year, whichever comes first.Remove the screw in the middle of the cam cover using a Torx screwdriver to expose the rocker arms and cam shaft. check the gap between the rocker arm and camshaft using feeler gauges. I picked up the Lisle 68100 Deluxe Feeler Gauge
The camshaft gear has a hole on one of the spokes. On mine there's also a white mark. Pull on the starter rope slowly until you get the hole at the 6 o'clock position. You did remove the spark plug wire right? Okay. As you pull the rope slowly you'll feel some resistance as it goes through the compression cycle. At the end of that compression cycle is when the hole is at the bottom.

The picture below has 3 arrows, retaining nut and adjustment nut on top, followed by rocker arm in the middle and finally the camshaft in the middle. Slide the feeler gauge underneath the rocker arm to check the clearance. The manual for my RY34426 says the 0.008 inch feeler gauge should not slide between the rocker arms and cam lobes, it should be held tight but the 0.006 feeler gauge should slide through with a little resistance.
 |
| Remember to remove the gasket before working on the rocker arms like I remembered to do after taking the photo. :) |
These diagrams from the manual give a better view than I could get with only 2 greasy hands.

When you're done making adjustments reassemble the motor.
Clean Air Filter
Remove the foam filter and wash it in soap and water then let it air dry. Once dry, spray it lightly with some oil then reinsert.Follow up by draining and replacing the oil, check all connections, screws, nuts to make sure everything is in proper working order. Replace any damaged parts.
Mar 23, 2015
Cheap Seed Starting Table Plans

Starting seeds indoors is fun and can save a lot of money. You also will have greater options on varieties that may not be available as plants locally.
This seed starting bench can be built for about $25 not including lights and is very sturdy. It can hold 2 1020 trays
The height is right to fit in front of a window and benefit from good southern exposure to reduce the amount of time you need to have your lights on the top shelf. Here's a partially completed one I built out of some scrap lumber I had available from another project. I made some improvements to the plan which you can follow.

You can use it with one or two 48" shop lights as grow lights. I'm currently only using 1 light. Most seeds don't need light to germinate. The way I use it is start with two trays for my tomatoes, eggplants and peppers on the top tray with a heating mat under them to speed germination. When the seedlings emerge I turn on the light for the top trays. About a month later I start my squash, zucchini, melons, etc on the lower shelf with the heat mat. By the time those later seedlings have germinated my tomatoes, eggplants and peppers have been transplanted to larger pots and moved outside. I then move those squash/melon trays up to the top shelf where they can get sun and artificial light.
What You'll Need
Materials
(2) 2x2 8' long furring strips(2) 1x3 8' long furring strips
(1) 10' long 1/2" EMT conduit
(4) 1/2" EMT conduit straps
(2) S Hooks
(2) Screw Hooks
(4) 3/4" Pulleys
(4) 2-1/2" Cord Cleats
about 18' of 1/8" braided nylon cord
Anti-Tip Straps
Tools
DrillKreg Pocket Hole Jig
Miter Saw
Tubing Cutter
3/8" Spacer
Cut List
(4) 35" 2x2 Legs(8) 8-3/4" 2x2 Shelf Supports (Measure and cut these after building the frame)
(8) 5" 2x2 Shelf Corner Brackets
(4) 47" 1x3 Long Side Rails
(4) 8" 1x3 Short Side Rails
Cut Plan
Don't cut the 8-3/4" Shelf Supports until after you've assembled the legs and side rails in case you need to make adjustments to the cuts. If your window sills are a different height than mine you may want to adjust the height of your legs to bring the top of the table up to where it will get the most light through your windows.Make sure your cuts are square and the lengths match so you wind up with a square bench. It's best to use a miter saw with some sort of stops so all the cuts are the same length were necessary. If you don't have a miter saw or a friend that can make the cuts for you I've had good experience in the past having lumber cut to size at Home Depot. Don't know if they can cut the angled pieces and the quality of the cutting is going to vary based on the skill of the person doing the cutting at your local store.

Step 1: Assemble Legs and Short Side Rails
Start by creating two leg assemblies each consisting of 2 legs and 2 Short Side Rails. One side rail will be flush with the top of the legs, the other will be positioned 6.5" up from the bottom of the legs.To place the Short Side Rails (3/4" thickness) in the middle of the 2x2 legs (1-1/2" thickness) you need to place a 3/8" spacer underneath the Short Side Rails. (See Tile Top Plant Table Plans for more details.)

Use 4 pocket screws in the back of each Short Side Rail to attach to the legs. Before screwing it together, make sure everything fits together well and is square. When you're happy that everything fits right, apply wood glue to the ends of the Short Side Rail pieces then clamp back together and drive the 1-1/4" pocket screws on the Short Side Rails. Once the screws are in you can remove the clamps to use on the other side.
Step 2: Join Leg Assemblies
The two leg assemblies you made in step 1 will now be joined using the Long Side Rails. The set up is similar to the leg assemblies with the Long Side Rails sitting on 3/8" spacers.
Line up the 2 leg assemblies with the backs (side with the pocket holes) facing each other and lay the Long Side Rails on the floor over 3/8" spacers with the pocket holes facing up. Check for fit then glue, clam and screw together.

Flip the bench over and do the other side.
Step 3: Attach Shelf Supports
The table is fairly strong as is but I wanted to add some more rigidity to the table since there isn't going to be a traditional wooden top so cut sine 2x2 to fit in between the Long Side Rails as shown. Measure the distance between the two rails before making your cuts because the length may change depending on variances in the thickness of the wood and spacers used.
You can screw or nail these in place. Because furring strips can split easily it's important to pre-drill holes if you're screwing or nailing them. I used a finish nailer.
Step 4: Attach Corner Brackets
The corner braces add a little more rigidity to the bench. Cut each so that they're about 5" long on the long end with an opposing 45 degree angle on each side then attach it to each corner. You can use pocket screws on the corner brackets or screw or nail from the side rails into the corner bracket. Again I used my finish nailer.
Step 5: Attach Light Supports
Cut the 10' long 1/2" metal conduit in half with a pipe cutter so you have 2 50" long pieces. Use 2 of the 1/2" Conduit Straps on each of the Short Side Rails to secure the conduit. Mark and measure the center of the Short Side Rails and make sure you're conduit is installed straight.On the top Short Side Rail use 2 conduit straps as shown and install one of the cleats on the front side of the straps. Remember to pre-drill your holes before driving screws to prevent splitting the wood.

On the bottom offset the conduit strap on the bottom so that it acts as a rest for the bottom of the conduit to sit on.

You can cut some notches in the conduit or use some scrap wood to provide a more stable surface for the conduit to rest on. Drilling a hole through the conduit and into the wood will allow you to install a screw for an even more installation.
Step 6: Install Insulation
The rigid insulation will act as your bench top. In addition to providing a flat, rigid surface to set your trays on, the insulation will direct the heat from the heat mat up towards the trays for more efficient tray warming. This National Garden Wholesale Super Sprouter 2-Tray Seedling Heat MatCut the 2' x 8' Insulation board in half lengthwise so you have 2 12" wide pieces then trim to fit the top. There will be a little overhang on the front and the back and you'll need to trim the bottom shelf insulation to fit around the legs and light supports. You can attach the insulation to the table with some construction adhesive.

Step 7: Install lighting
For the top light, drill a small hole on the top of each length of conduit, insert an S hook and hang a pulley on it.For the bottom light you can either either do the same as for the top light by drilling a small hole for an s hook in the conduit towards the bottom of the upper shelf or you can use screw hooks drilled and screwed into the underside of the top shelf.
Run the cord through the pulleys and attach to the lights. Leave enough length of cord to allow you plenty of room to raise and lower your lights. Tie off the end of the line to the cleats using a cleat hitch.
Step 8: Anti-Tip Straps
Provided the bench was assembled correctly it should be very stable but you may want to provide additional support especially if you have pets, children or live in an area prone to earthquakes. Follow the instructions on the Anti-Tip Straps to attach the bench to the wall or window sill to prevent it from accidentally tipping over.Mar 17, 2015
DIY Printed Plant Labels
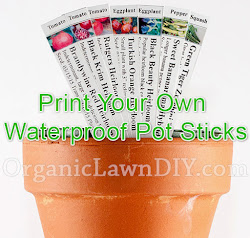
I've been looking for a good, affordable solution to print my own pot sticks at home for the vegetable plants I start from seeds. Partly because I like how neat good pot sticks look and partly because I'm going to be starting a few more plants than usual this year. (Okay, really it's because my handwriting on plastic pot sticks sucks.) After a bit of trial I've come up with a good solution that will allow me to print professional looking pot sticks with my laser printer.
Mar 15, 2015
Cost Effective Air Cleaning Plants

Feb 28, 2015
Narrow Seed Starting Shelves
